Raw SQL Queries

Entity Framework allows you to query using LINQ with your entity classes. However, there may be times that you want to run queries using raw SQL directly against the database. This includes calling stored procedures, which can be helpful for Code First models that currently do not support mapping to stored procedures. The techniques shown in this topic apply equally to models created with Code First and the EF Designer.

Writing SQL queries for entities

The SqlQuery method on DbSet allows a raw SQL query to be written that will return entity instances. The returned objects will be tracked by the context just as they would be if they were returned by a LINQ query. For example:

using (var context = new BloggingContext())
{
    var blogs = context.Blogs.SqlQuery("SELECT * FROM dbo.Blogs").ToList();
}

Note that, just as for LINQ queries, the query is not executed until the results are enumerated—in the example above this is done with the call to ToList.

Care should be taken whenever raw SQL queries are written for two reasons. First, the query should be written to ensure that it only returns entities that are really of the requested type. For example, when using features such as inheritance it is easy to write a query that will create entities that are of the wrong CLR type.

Second, some types of raw SQL query expose potential security risks, especially around SQL injection attacks. Make sure that you use parameters in your query in the correct way to guard against such attacks.

Loading entities from stored procedures

You can use DbSet.SqlQuery to load entities from the results of a stored procedure. For example, the following code calls the dbo.GetBlogs procedure in the database:

using (var context = new BloggingContext())
{
    var blogs = context.Blogs.SqlQuery("dbo.GetBlogs").ToList();
}

You can also pass parameters to a stored procedure using the following syntax:

using (var context = new BloggingContext())
{
    var blogId = 1;

    var blogs = context.Blogs.SqlQuery("dbo.GetBlogById @p0", blogId).Single();
}

Writing SQL queries for non-entity types

A SQL query returning instances of any type, including primitive types, can be created using the SqlQuery method on the Database class. For example:

using (var context = new BloggingContext())
{
    var blogNames = context.Database.SqlQuery<string>(
                       "SELECT Name FROM dbo.Blogs").ToList();
}

The results returned from SqlQuery on Database will never be tracked by the context even if the objects are instances of an entity type.

Sending raw commands to the database

Non-query commands can be sent to the database using the ExecuteSqlCommand method on Database. For example:

using (var context = new BloggingContext())
{
    context.Database.ExecuteSqlCommand(
        "UPDATE dbo.Blogs SET Name = 'Another Name' WHERE BlogId = 1");
}

Note that any changes made to data in the database using ExecuteSqlCommand are opaque to the context until entities are loaded or reloaded from the database.

Output Parameters

If output parameters are used, their values will not be available until the results have been read completely. This is due to the underlying behavior of DbDataReader, see Retrieving Data Using a DataReader for more details.


Reference: http://msdn.microsoft.com/en-us/data/jj592907.aspx

SQL Server CONVERT() Function

select CONVERT(VARCHAR(10), GETDATE(), 110) -- 110 is format "dd-mm-yyyy"

Without century With century Input/Output Standard
0 100 mon dd yyyy hh:miAM/PM Default
1 101 mm/dd/yyyy US
2 102  yyyy.mm.dd ANSI
3 103  dd/mm/yyyy British/French
4 104 dd.mm.yyyy German
5 105  dd-mm-yyyy Italian
6 106 dd mon yyyy -
7 107 Mon dd, yyyy -
8 108 hh:mm:ss -
9 109 mon dd yyyy hh:mi:ss:mmmAM (or PM) Default + millisec
10 110 mm-dd-yyyy USA
11 111  yyyy/mm/dd Japan
12 112  yyyymmdd ISO
13 113 dd mon yyyy hh:mi:ss:mmm Europe (24 hour clock)>
14 114 hh:mi:ss:mmm 24 hour clock
20 120 yyyy-mm-dd hh:mi:ss ODBC canonical (24 hour clock)
21 121 yyyy-mm-dd hh:mi:ss.mmm ODBC canonical (24 hour clock)
126 yyyy-mm-ddThh:mi:ss.mmm ISO8601
127 yyyy-mm-ddThh:mi:ss.mmmZ ISO8601 (with time zone Z)
130 dd mon yyyy hh:mi:ss:mmmAM Hijiri
131 dd/mm/yy hh:mi:ss:mmmAM Hijiri

Link for all codes form formats:
https://www.w3schools.com/sql/func_sqlserver_convert.asp

SSMS Dark theme

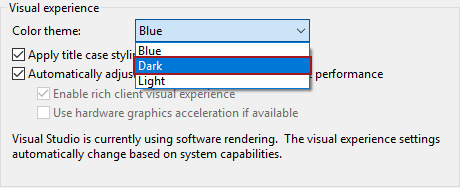
In SQL Server Management Studio 2016, Microsoft introduced a visual setting option to choose between the Blue and Light color theme. In SSMS 2016, SSMS 2017 and the latest SSMS 18, the user can switch between the Blue or Light theme by going to Tools | Options | Environment | General | Color theme:

Visual experience settings of SSMS in the Options dialog

SSMS Dark theme

Although it’s not officially supported by Microsoft, the Dark theme is also available in SQL Server Management Studio 2016, 17, and the latest 18 version. The dark theme has been very popular among SQL database administrators and developers. To enable the SSMS Dark theme, follow these simple steps.

Close SSMS if it is running. Run any text editor as an administrator, in this case, Notepad++ is used, in order to edit the SSMS configuration file:

Running Notepad++ as an administrator

The configuration (ssms.pkgundef) file is located at the following locations:

SSMS 2016

C:\Program Files (x86)\Microsoft SQL Server\130\Tools\Binn\ManagementStudio

SSMS 17

C:\Program Files (x86)\Microsoft SQL Server\140\Tools\Binn\ManagementStudio

SSMS 18

C:\Program Files (x86)\Microsoft SQL Server Management Studio 18\Common7\IDE

Depending on SSMS version, locate and open the configuration file (ssms.pkgundef) in the text editor:

Opening the SSMS configuration file with Notepad++

Once the file is opened in the text editor, scroll down and find the section of the code under the “Remove Dark theme” heading, add “//” (without quotation marks) at the beginning of the first line like shown below, and save the file:

SQL Server Management Studio configuration file opened in Notepad++

Once completed, start SQL Server Management Studio and the Dark color theme will be available in the Color theme drop-down box:

SSMS Dark theme option under Visual experience settings

Problem with upgrades

Each upgrade of the latest generation of SSMS will set the configuration file back to its defaults. This will, of course, overwrite the tweak we made earlier and the Dark theme will no longer be available in the options.

Instead of doing the same steps to enable the SSMS Dark theme each time there is an upgrade, thanks to a reader (Luka Lovre) who made a PowerShell script, there’s an easier way with the same outcome which can be achieved in just a few clicks.

All we need to do is to run either Command Prompt or Windows PowerShell which is designed to improve the command-line and scripting. Either way, make sure to run the interpreter as an administrator or you’ll get an error message that access to the path is denied:

Running the script in Windows PowerShell without admin permissions

I’d go with the PowerShell because, in some cases, even upon successful execution of the script in Command Prompt, the changes are not applied (the case with SSMS 17.7). So, in this example, Windows PowerShell is used.

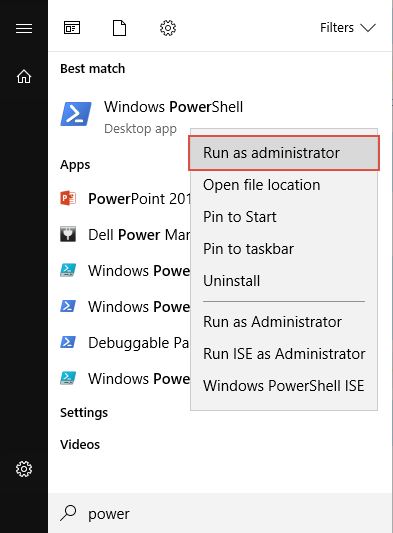
To run the PowerShell as an administrator, click Start, type PowerShell, right-click Windows PowerShell, and then choose Run as administrator:

Running Windows PowerShell as administrator

Depending on the version of SSMS, copy the appropriate script into the clipboard, paste it in PowerShell and hit Enter to execute it:

SSMS 2016

powershell -Command “(gc ‘C:\Program Files (x86)\Microsoft SQL Server\130\Tools\Binn\ManagementStudio\ssms.pkgundef’) -replace ‘\[\`$RootKey\`$\\Themes\\{1ded0138-47ce-435e-84ef-9ec1f439b749}\]’, ‘//[`$RootKey`$\Themes\{1ded0138-47ce-435e-84ef-9ec1f439b749}]’ | Out-File ‘C:\Program Files (x86)\Microsoft SQL Server\130\Tools\Binn\ManagementStudio\ssms.pkgundef'”

SSMS 17

powershell -Command “(gc ‘C:\Program Files (x86)\Microsoft SQL Server\140\Tools\Binn\ManagementStudio\ssms.pkgundef’) -replace ‘\[\`$RootKey\`$\\Themes\\{1ded0138-47ce-435e-84ef-9ec1f439b749}\]’, ‘//[`$RootKey`$\Themes\{1ded0138-47ce-435e-84ef-9ec1f439b749}]’ | Out-File ‘C:\Program Files (x86)\Microsoft SQL Server\140\Tools\Binn\ManagementStudio\ssms.pkgundef'”

SSMS 18

powershell -Command “(gc ‘C:\Program Files (x86)\Microsoft SQL Server Management Studio 18\Common7\IDE\ssms.pkgundef’) -replace ‘\[\`$RootKey\`$\\Themes\\{1ded0138-47ce-435e-84ef-9ec1f439b749}\]’, ‘//[`$RootKey`$\Themes\{1ded0138-47ce-435e-84ef-9ec1f439b749}]’ | Out-File ‘C:\Program Files (x86)\Microsoft SQL Server Management Studio 18\Common7\IDE\ssms.pkgundef'”

The successfully executed script in Windows PowerShell to enable SSMS Dark theme

There will be no return message that the operation succeeded except the blinking cursor on a new line.

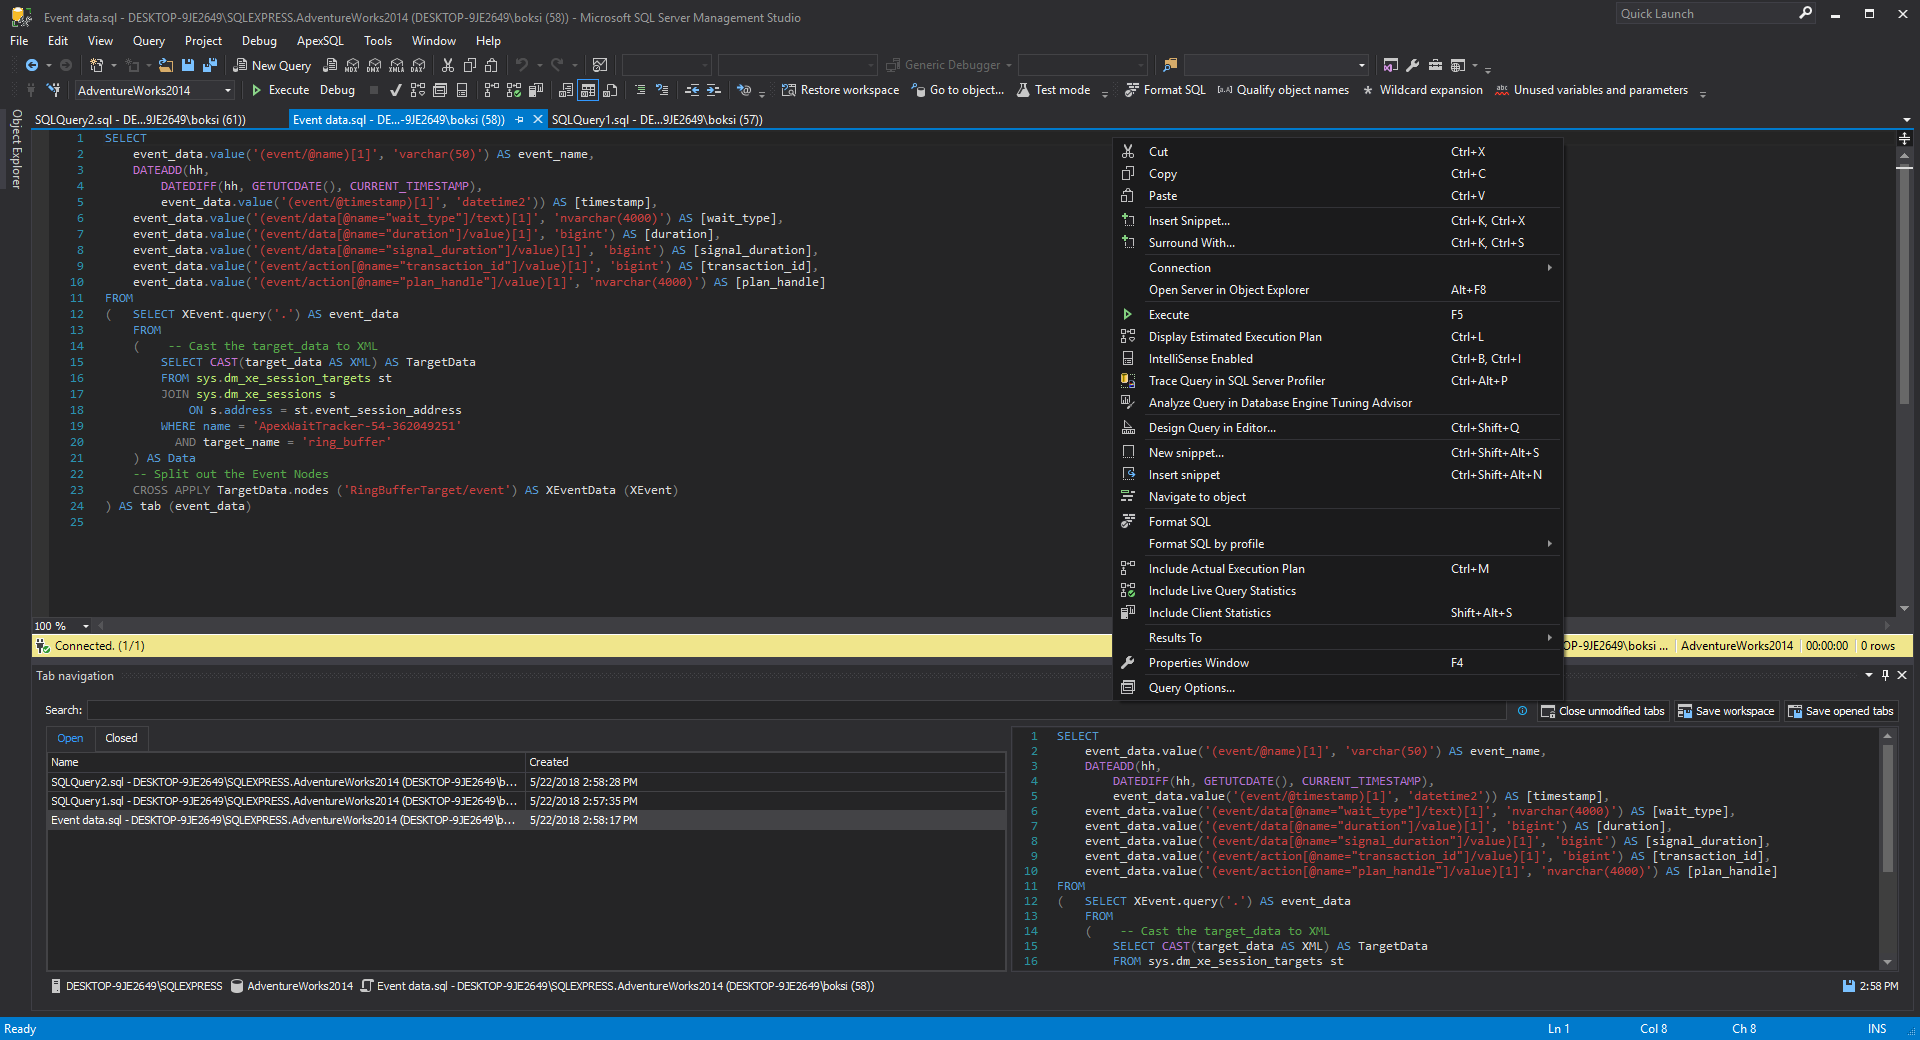
Once either of those two methods is done, startup SSMS, and change the visual appearance to dark. Here’s how it looks:

SSMS Dark theme

Note: As I mentioned before, the SSMS Dark theme is not officially supported and it probably never be and that’s why it is disabled by default. There might be some visual deviations e.g. white background in the Object Explorer, Results grid, etc.

Credits: https://bit.ly/2NJp1Pq

Design Patterns: Queue-Based Load Leveling Pattern

Modern software usually involves running tasks that invoke services. If the service is subjected to intermittent heavy loads, it can cause performance or reliability issues. If the same service is utilized by a number of tasks running concurrently, it can be difficult to predict the volume of requests to which the service might be subjected at any given point in time.

It is possible that a service might experience peaks in demand that cause it to become overloaded and unable to respond to requests in a timely manner. Flooding a service with a large number of concurrent requests may also result in the service failing if it is unable to handle the contention that these requests could cause.

The Asynchronous Queue

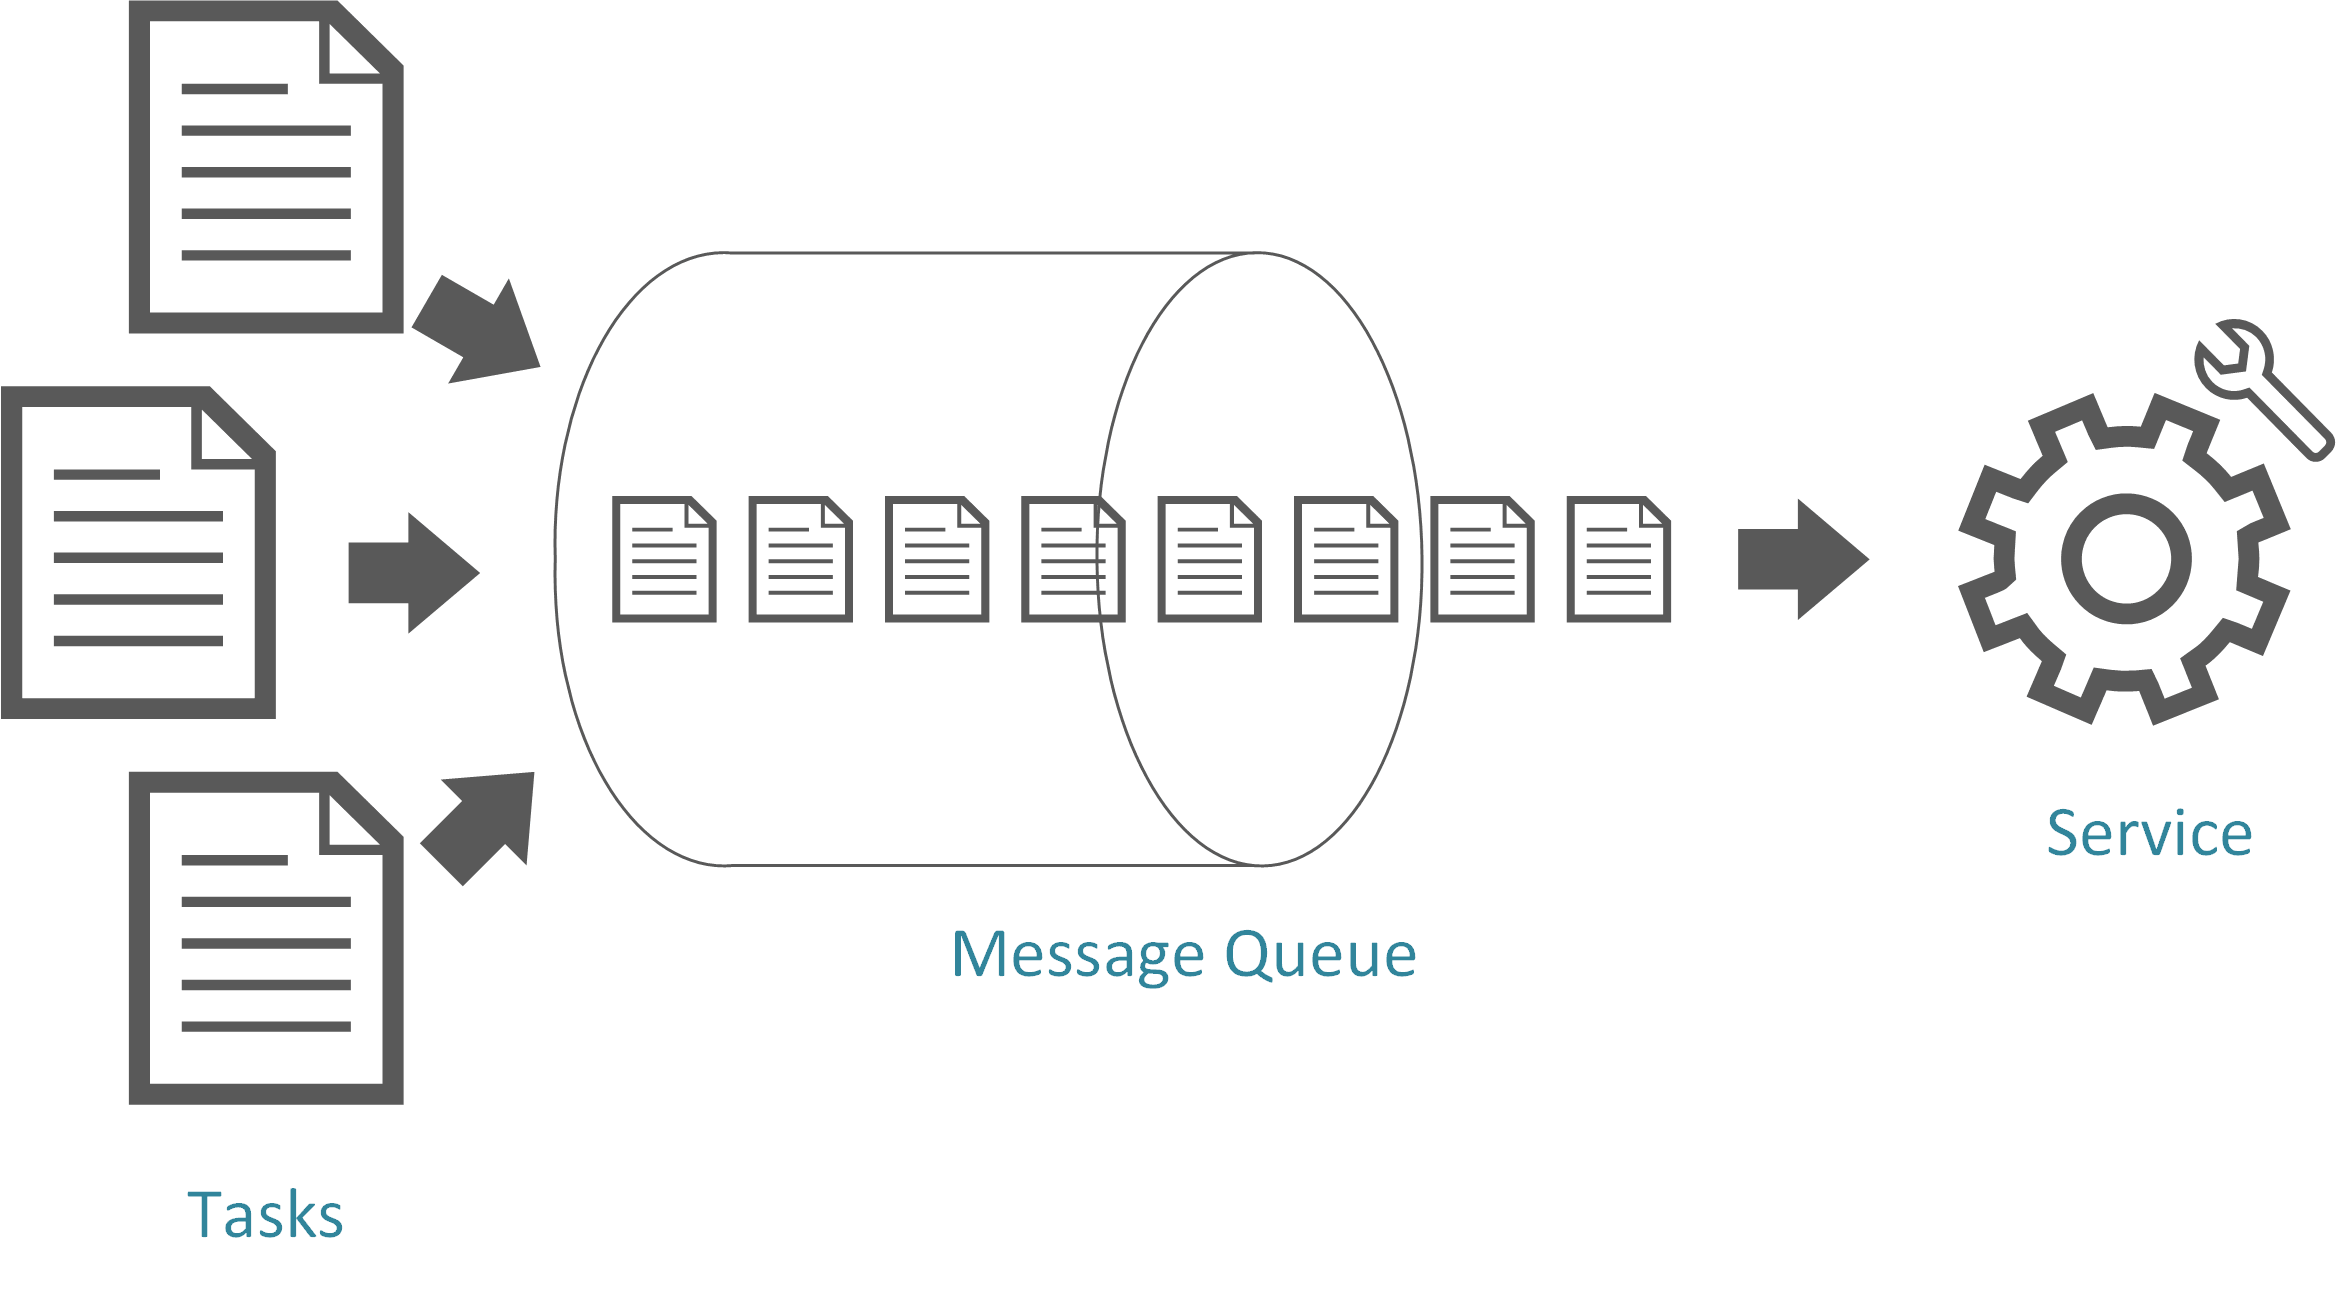
By introducing an Asynchronous Queue between a task and a service, you will be decoupling the task from the serviceThe service will be able to handle the messages at its own pace, irrespective of the volume of requests from concurrent tasks.

Using a Queue

The queue acts as a buffer, storing the message until it is retrieved by the service. The service retrieves the messages from the queue and processes them.

Requests from a number of different tasks, which can be generated at a highly variable rate, can be passed to the service through the same message queue and will be processed at a constant rate that the service can work at.

Benefits

  • Maximizing Availability: Delays or Downtime of the service does not affect the application generating the messages
  • Maximizing Scalability: Number of Queues and Services can be varied to meet Demand. In a later blog post, I discussed the Competing Consumer Pattern, which helps in scaling your applications by running multiple instances of a service, each of which act as a message consumer from the load-leveling queue.
  • Control Costs: You don’t have to design your service to meet peak load, but rather average load

Considerations

The biggest consideration to keep it mind when implementing the Queue-Based Load Leveling Pattern is that an Asynchronous Queue is a one-way communication mechanism! If a task expects a reply from a service, it may be necessary to implement a mechanism that the service can use to send a response.

Message Brokers

Message Brokers are servers that take care of Queue Handling, Routing Messages, High Availability and Scaling out. There are many different message brokers and discussing which is best in which scenario would take a whole blog post, but a few famous ones are:

  • RabbitMQ – Popular, Reliable, Excellent Documentation, Easy to Install, Configure and Use, Clutering, High Availability, Multi-Protocol, Runs on all major Operating Systems, Supports a huge number of developer platforms, Written in Erlang
  • Azure Service Bus – The Go-To choice if you’re already on Azure, High Throughput, Predictable Performance, Predictable Pricing, Secure, Scalable on Demand
  • Apache Kafka – High-Throughput, Low-Latency, Uses Apache ZooKeeper for Distribution, Written in Scala and Java
  • Amazon Simple Queue Service – The Go-To choice if you’re already on AWS, Reliable, Simple, Flexible, Scalable, Secure, Inexpensive

A choice of Message Broker requires careful consideration as each has their pros and cons.


Refs:

link1
link2

Sql Server, Create Temp Table


-- drop table #tmp_palnets
IF OBJECT_ID('tempdb..#tmp_palnets') IS NOT NULL DROP TABLE #tmp_palnets
print('DROP TABLE #tmp_palnets')
GO
-- create temp table
create table #tmp_palnets  (NR_ORDER int,NR_DISTANCE int,NM_COLOR nvarchar(50), NM_NAME nvarchar(50))

-- populate table
insert into #tmp_palnets values (1	,2985	,'BLUE'		,'earth')
insert into #tmp_palnets values (2	,135	,'RED'		,'mars')
insert into #tmp_palnets values (3	,128741	,'GRAY'		,'pluto')

-- select temp data
select * from #tmp_palnets<span data-mce-type="bookmark" id="mce_SELREST_start" data-mce-style="overflow:hidden;line-height:0" style="overflow:hidden;line-height:0;">&#65279;</span>


Result:

temp_table_result

Migrations Commands

Favorite:
View Script: Update-Database -Script -SourceMigration:0

——————————–

Enable-Migrations
Enables Code First Migrations in a project.

Syntax
Enable-Migrations [-ContextTypeName ] [-EnableAutomaticMigrations]
[-MigrationsDirectory ] [-ProjectName ] [-StartUpProjectName ]
[-ContextProjectName ] [-ConnectionStringName ] [-Force]
[-ContextAssemblyName ] [-AppDomainBaseDirectory ] []

Enable-Migrations [-ContextTypeName ] [-EnableAutomaticMigrations]
[-MigrationsDirectory ] [-ProjectName ] [-StartUpProjectName ]
[-ContextProjectName ] -ConnectionString
-ConnectionProviderName [-Force] [-ContextAssemblyName ]
[-AppDomainBaseDirectory ] []
Description
Enables Migrations by scaffolding a migrations configuration class in the project. If the target database was created by an initializer, an initial migration will be created (unless automatic migrations are enabled via the EnableAutomaticMigrations parameter).

—————–

Add-Migration
Scaffolds a migration script for any pending model changes.

Syntax
Add-Migration [-Name] [-Force] [-ProjectName ] [-StartUpProjectName ]
[-ConfigurationTypeName ] [-ConnectionStringName ] [-IgnoreChanges]
[-AppDomainBaseDirectory ] []

Add-Migration [-Name] [-Force] [-ProjectName ] [-StartUpProjectName ]
[-ConfigurationTypeName ] -ConnectionString -ConnectionProviderName
[-IgnoreChanges] [-AppDomainBaseDirectory ] []

—————–

Update-Database
Applies any pending migrations to the database.

Syntax
Update-Database [-SourceMigration ] [-TargetMigration ] [-Script] [-Force]
[-ProjectName ] [-StartUpProjectName ] [-ConfigurationTypeName ]
[-ConnectionStringName ] [-AppDomainBaseDirectory ] []

Update-Database [-SourceMigration ] [-TargetMigration ] [-Script] [-Force]
[-ProjectName ] [-StartUpProjectName ] [-ConfigurationTypeName ]
-ConnectionString -ConnectionProviderName
[-AppDomainBaseDirectory ] []
Description
Updates the database to the current model by applying pending migrations.

Parameters
-SourceMigration
Only valid with -Script. Specifies the name of a particular migration to use as the update’s starting point. If ommitted, the last applied migration in the database will be used.

-TargetMigration
Specifies the name of a particular migration to update the database to. If ommitted, the current model will be used.

-Script
Generate a SQL script rather than executing the pending changes directly.

-Force
Specifies that data loss is acceptable during automatic migration of the database.

-ProjectName
Specifies the project that contains the migration configuration type to be used. If ommitted, the default project selected in package manager console is used.

-StartUpProjectName
Specifies the configuration file to use for named connection strings. If omitted, the specified project’s configuration file is used.

-ConfigurationTypeName
Specifies the migrations configuration to use. If omitted, migrations will attempt to locate a single migrations configuration type in the target project.

-ConnectionStringName
Specifies the name of a connection string to use from the application’s configuration file.

-ConnectionString
Specifies the the connection string to use. If omitted, the context’s default connection will be used.

-ConnectionProviderName
Specifies the provider invariant name of the connection string.

-AppDomainBaseDirectory
Specifies the directory to use for the app-domain that is used for running Migrations code such that the app-domain is able to find all required assemblies. This is an advanced option that should only be needed if the solution contains several projects such that the assemblies needed for the context and configuration are not all referenced from either the project containing the context or the project containing the migrations.

Changing local path in team foundation server

If you want to change the local path for the working directory of the Team Foundation Server (TFS), you need to go to File -> Source Control -> Workspaces, then select your workspace (it should match your computer name) and click Edit.

In the next dialog change the mapping for the root TFS node to the new location on your hard drive.

Important! You need to perform a “Get” on the whole TFS tree to update project associations.

VS 2013 the path is: File | Source Control | Advanced | Workspaces…